
5G Standalone Registration: AS Security, RRC Reconfiguration, and Data Transfer Explained

5G Standalone Registration: AS Security, RRC Reconfiguration, and Data Transfer Steps
After the NAS authentication and security checks in a 5G Standalone (SA) network are done, we move on to the final stages of the registration process—activating Access Stratum (AS) security, reconfiguring the RRC, and setting up data sessions. These steps are what turn a newly authenticated User Equipment (UE) into a fully functional device that can securely send and receive user data over the 5G Core.
The image shared illustrates this vital phase, detailing the messages exchanged between User Equipment (UE), gNB (Next Generation NodeB), and 5GC (which includes AMF and UPF). Let’s take a closer look at each step.
Overview of the Final Phase of 5G SA Registration
Once the NAS-level security is all set (which we discussed earlier), the next phase involves:
Setting up AS-level security between UE and gNB.
Configuring RRC parameters to establish the data radio bearers.
Completing the PDU session setup for transferring user plane data.
This means that the UE is now ready to send and receive IP packets securely via the User Plane Function (UPF) in the 5G Core.
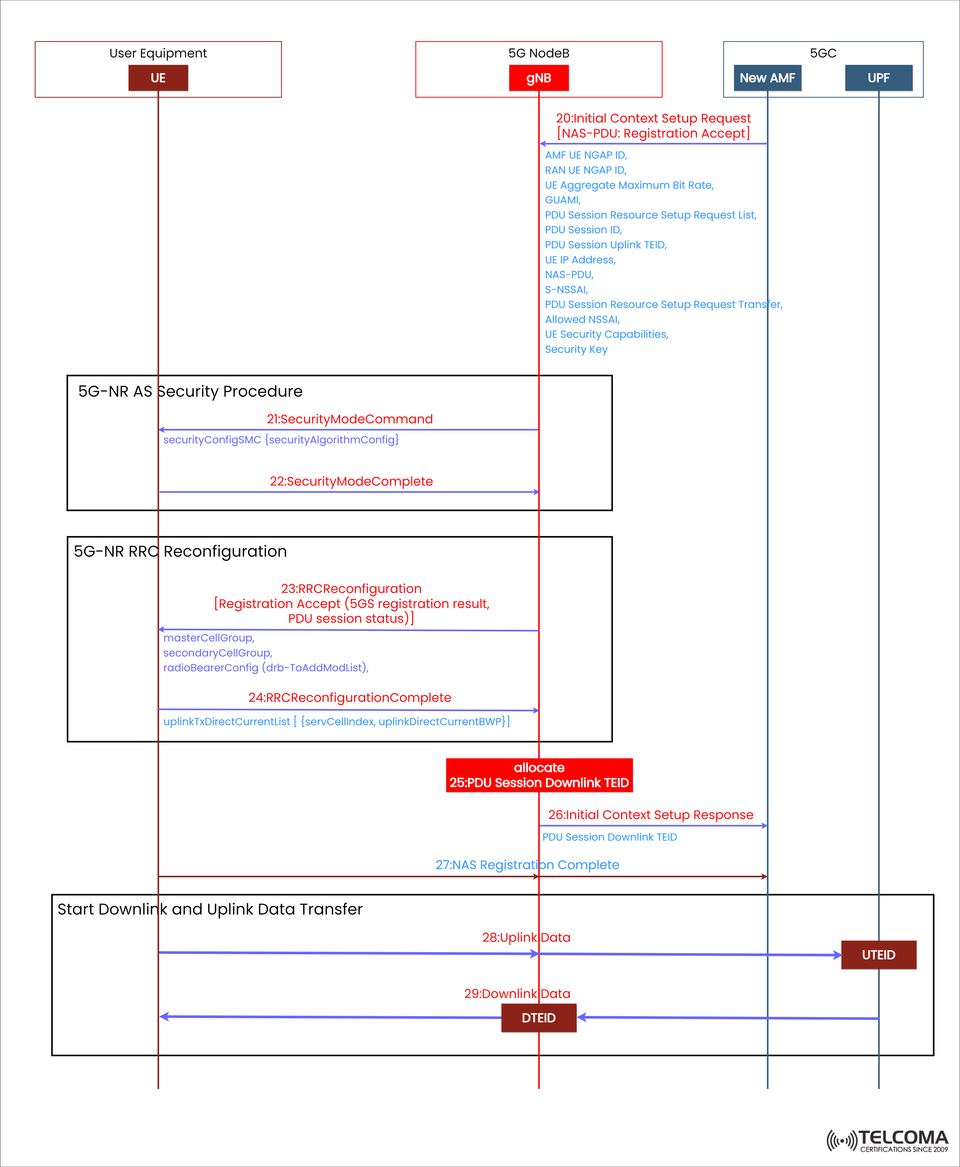
Step 20: Initial Context Setup Request (NAS-PDU: Registration Accept)
As soon as the UE receives the NAS Security Mode Complete message, the AMF kicks off the Initial Context Setup Request to the gNB.
This message is a part of the NGAP (Next Generation Application Protocol) and includes essential configuration info for setting up the UE’s context on the gNB side.
Key Contents:
AMF UE NGAP ID and RAN UE NGAP ID
UE Aggregate Maximum Bit Rate (AMBR)
GUAMI (Globally Unique AMF Identifier)
PDU Session Resource Setup Request List
PDU Session IDs and TEIDs (Tunnel Endpoint Identifiers)
UE IP Address
Allowed and S-NSSAI (Network Slice Information)
UE Security Capabilities and Derived Security Keys
Purpose:
This message tells the gNB that the UE’s registration got the green light from the core, prompting the gNB to set up the necessary radio and bearer resources.
5G-NR AS Security Procedure
Next up, the Access Stratum Security is initiated between the UE and gNB, making sure all RRC and user-plane messages are encrypted and secured.
Step 21: Security Mode Command
The gNB sends a Security Mode Command (SMC) to the UE, which includes:
security ConfigSMC, covering: * Ciphering algorithm (NEA1, NEA2, NEA3) * Integrity protection algorithm (NIA1, NIA2, NIA3)
Purpose:
To set up the encryption and integrity algorithms for AS-level protection.
Step 22: SecurityModeComplete
The UE responds back with a Security Mode Complete message, confirming that the AS security parameters are now in place.
From here on, all communication between the UE and gNB is now encrypted and integrity protected using derived keys (KRRCint, KRRCenc, and KUPenc).
5G-NR RRC Reconfiguration
Once AS security is active, we move to RRC Reconfiguration where the gNB provides the UE with the radio resource setups for user-plane communication.
Step 23: RRC Reconfiguration
This message includes:
Registration Accept (NAS-PDU)
PDU Session Status (info on whether each PDU session setup succeeded or failed)
Master Cell Group and Secondary Cell Group configuration (for CA or dual connectivity)
Radio Bearer Config, including DRB-To Add ModList for setting up data bearers.
Purpose:
To configure the radio link for transmitting user data and finish up the registration process.
Step 24: RRC Reconfiguration Complete
Next, the UE replies with RRC Reconfiguration Complete, confirming that the RRC parameters and radio bearers have been set up successfully.
It also includes details like:
uplink Tx Direct Current List,
serv Cell Index, and
uplink Direct Current BWP.
At this point, the UE is fully synchronized and ready to transfer data in both directions.
PDU Session Setup and TEID Allocation
Following the RRC reconfiguration, we now turn to establishing the user plane between gNB and UPF through the N3 interface.
Step 25: Allocate PDU Session Downlink TEID
The gNB assigns a Downlink TEID (Tunnel Endpoint Identifier) for the PDU session.
This identifier uniquely marks the data tunnel endpoint for downlink traffic at the gNB.
Step 26: Initial Context Setup Response
The gNB sends back an Initial Context Setup Response to the AMF, detailing:
Confirmation of PDU Session setup
Allocated Downlink TEID information
This confirms successful bearer setup between the gNB and UPF.
NAS Registration Completion
Step 27: NAS Registration Complete
The UE sends a NAS Registration Complete message to the AMF, marking the successful end of the 5G registration process.
This message ensures that both the RAN and Core have aligned session and context information for the UE. Now, the device is fully registered and ready to communicate in 5G SA mode.
Start of Uplink and Downlink Data Transfer
With all control plane setups done, the user plane is now live.
Step 28: Uplink Data
The UE sends uplink data through the gNB using the Uplink TEID (UTEID), which identifies the uplink data tunnel endpoint.
Step 29: Downlink Data
The UPF (via the gNB) sends downlink data to the UE using the Downlink TEID (DTEID).
At this stage, the 5G SA connection is completely active, allowing the UE to access services like internet browsing, voice over NR (VoNR), or data streaming.
Key Concepts Explained
AS vs NAS Security
NAS Security: This protects control signaling between UE and AMF.
AS Security: This safeguards both control and user data between UE and gNB.
These two types work together to ensure confidentiality, integrity, and proper authentication across the network.
RRC Reconfiguration
This is one of the most crucial steps in 5G NR, enabling the dynamic adjustment of:
Radio Bearers (SRB, DRB)
Bandwidth Parts (BWP)
Cell Group configurations
Mobility parameters
This flexibility allows the radio link to adapt to current network conditions and service needs.
PDU Session and TEID
In 5G, PDU sessions serve as logical data connections between the UE and Data Network (DN). Each session uses TEIDs (Tunnel Endpoint Identifiers) to transport data through GTP-U tunnels over interfaces like N3 (gNB–UPF).
Practical Implications for Telecom Professionals
Getting a grip on this phase is crucial for:
RAN engineers, to check AS and RRC procedures.
Core engineers, to ensure smooth communication between AMF and UPF.
Network testers, to track signaling flows during the registration process.
Security specialists, to verify that encryption and integrity setups are correct.
Any misconfiguration at this stage—like wrong TEID mapping or mismatched security settings—can lead to failed data sessions or potential security risks.
Advantages of 5G SA’s Layered Security Approach
5G SA’s multi-layered security framework (NAS + AS) offers:
End-to-end encryption from UE to 5GC.
Stronger data integrity to prevent tampering.
Better privacy with SUCI-based identification.
Dynamic bearer management for high speeds and low latency.
This enhances 5G SA’s performance, security, and reliability compared to NSA or LTE systems.
Conclusion
The final phase of 5G Standalone Registration—comprising AS security activation, RRC reconfiguration, and data plane setup—wraps up the 5G attach process.
From the Initial Context Setup to the PDU session establishment, every step guarantees that the UE and network function in a trusted, secure, and high-performance environment.
Once the NAS and AS layers are fully in sync, the UE moves into active service mode, ready to transfer both uplink and downlink data through the 5G Core.
Overall, this comprehensive coordination of signaling, authentication, and bearer setup highlights why 5G SA represents a significant advancement in mobile network design—bringing together speed, efficiency, and top-notch security.